


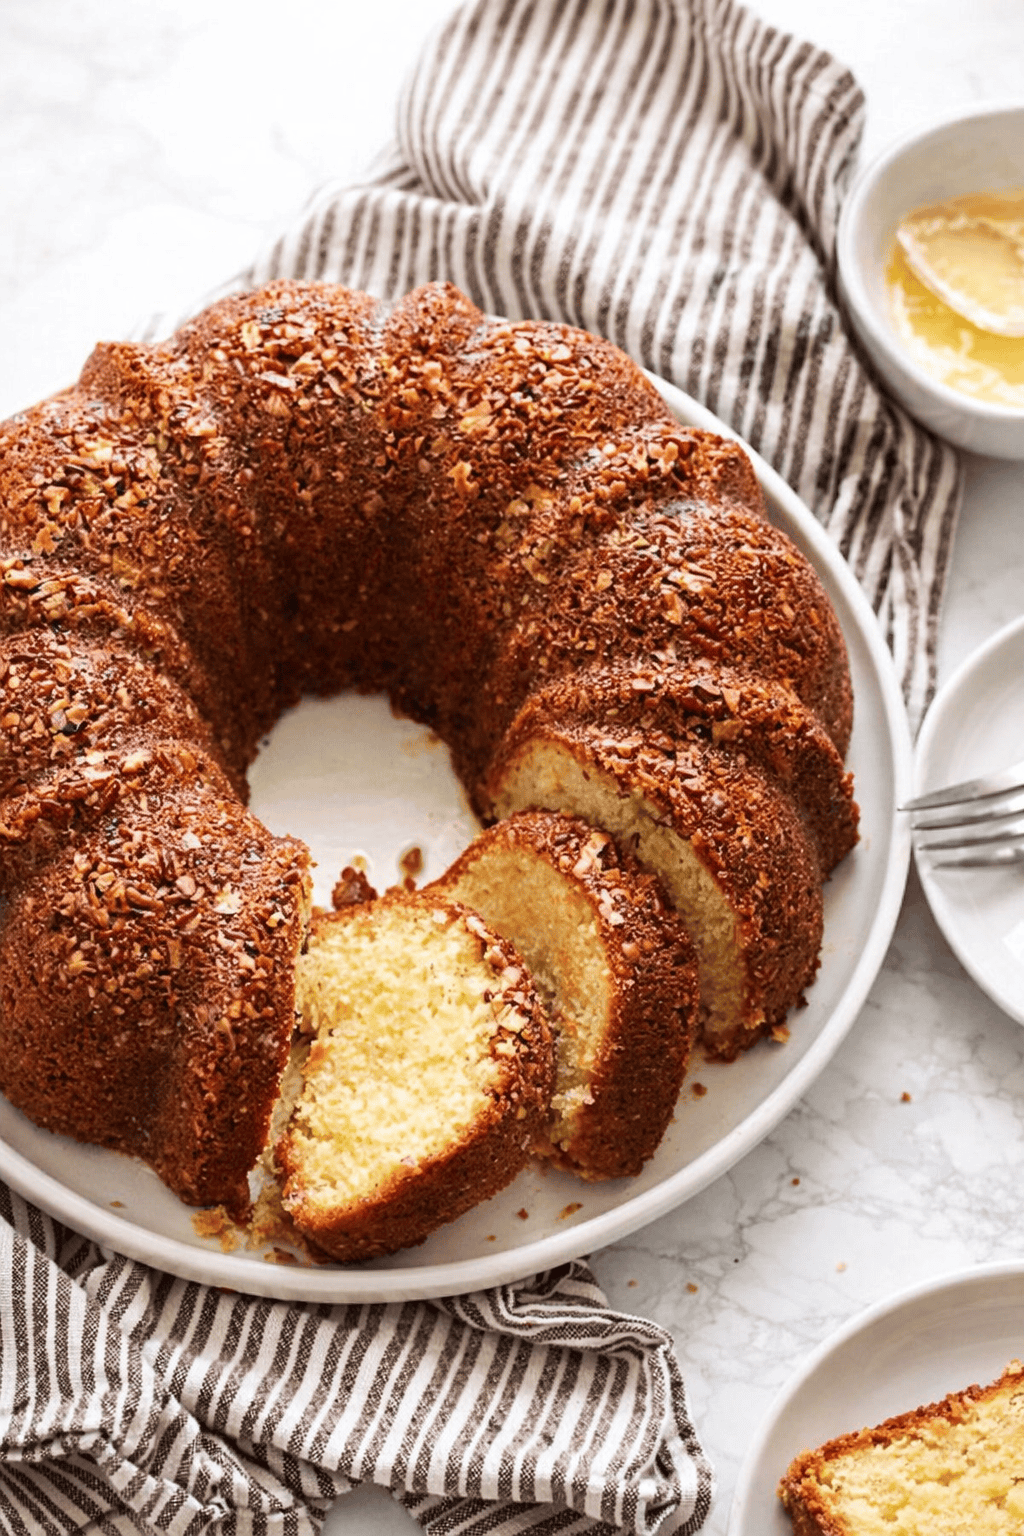
Traditional rum cake from scratch-no mixes-just pure homemade goodness. Light, tender, topped with chopped pecans, and drizzled with an addictive rum glaze. So good, you’ll want to eat the whole thing.

Boozy rum cake – Oh YES!!!
Let me tell you about this cake and how delightful it is. I adapted it from Carole Walter’s absolutely BEST yellow cake. I guess when you label a cake the absolute best, you’re bound to get a lot of people poking at the recipe. However, I have to say that it is sooo good – definitely a keeper.
Okay, let’s keep going. What makes this cake worthy of your time? The texture is buttery and fluffy–one that would have made my home economics teacher leap with joy. Now, if only I had this recipe when I was taking my finals in school, just maybe, I would have gotten an A in her class. Sadly, though, I got a B.

Why Rum Makes a Yellow Cake Even Better
You know me, your girl can’t help herself. I had to make a few adjustments for an easier and even better cake. Guaranteed to please! I reduced the sugar to 1¾ cups and upped the flavor with rum and nutmeg. Yes, I love nutmeg, but you can leave it out if you want.
Besides adding moisture, rum also adds depth of flavor and a light caramel taste. Did you know that alcohol also breaks down gluten for a more tender crumb? It also carries the flavors from fats and water-soluble ingredients for better distribution.
And don’t worry about the alcohol content, because it evaporates during baking and cooking. So that means it’s still kid-friendly.
How to Make Rum Cake
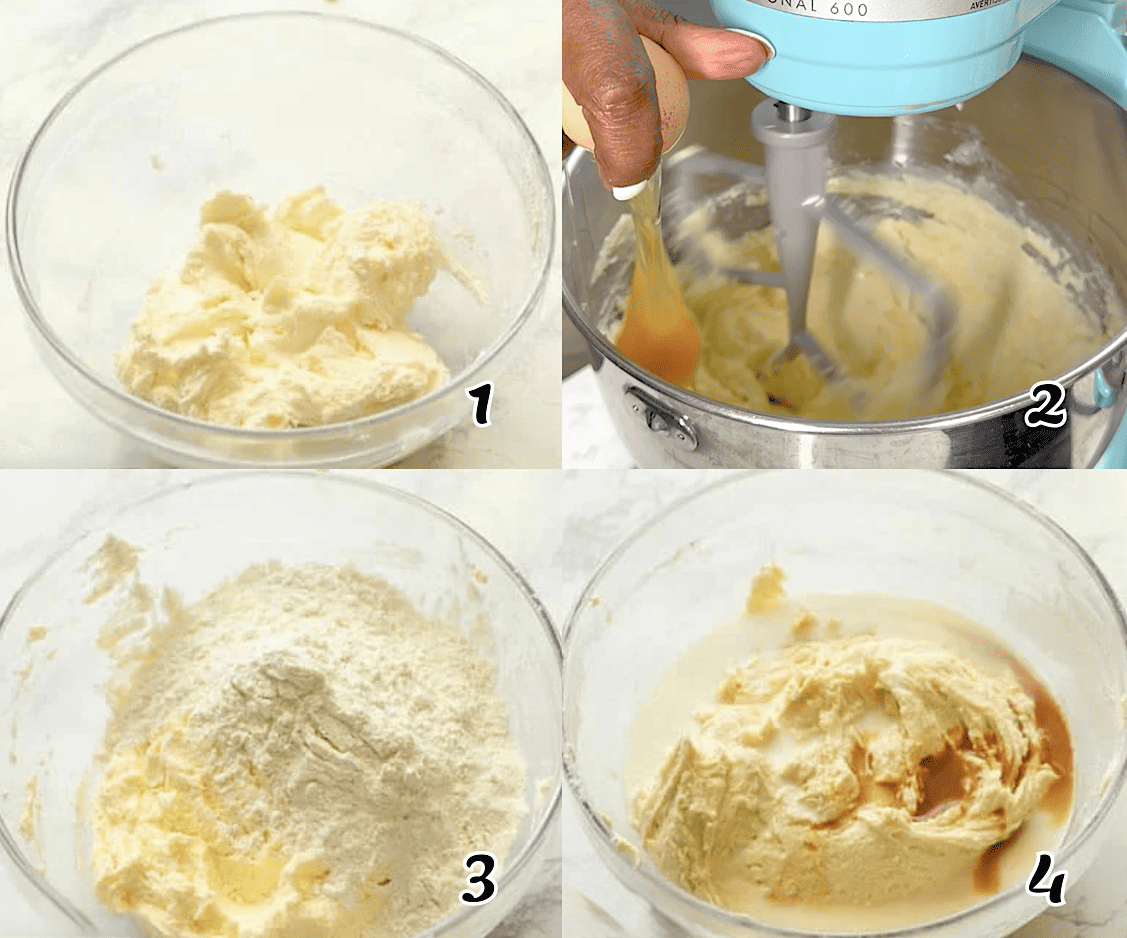
- Cream the butter and sugar until fluffy and starting to look white, 5-7 minutes. (Photo 1)
- Beat in the eggs, one at a time, adding a tablespoon of the flour with the last egg to prevent the batter from curdling. (Photo 2)
- Add the flour, powdered milk, and baking powder into the batter, alternating with the milk until fully combined. (Photo 3)
- Stir in the rum, vanilla extract, and nutmeg, and mix until everything is fully combined. (Photo 4)
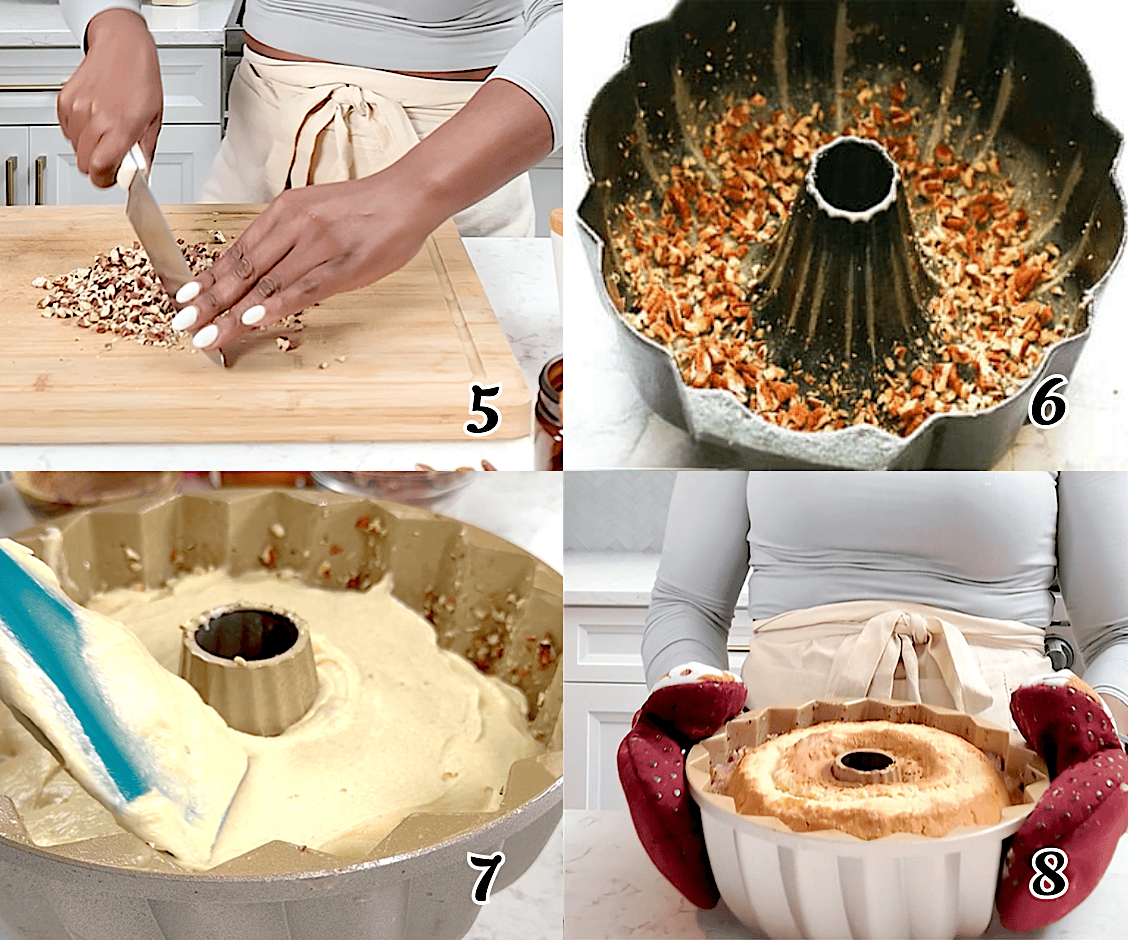
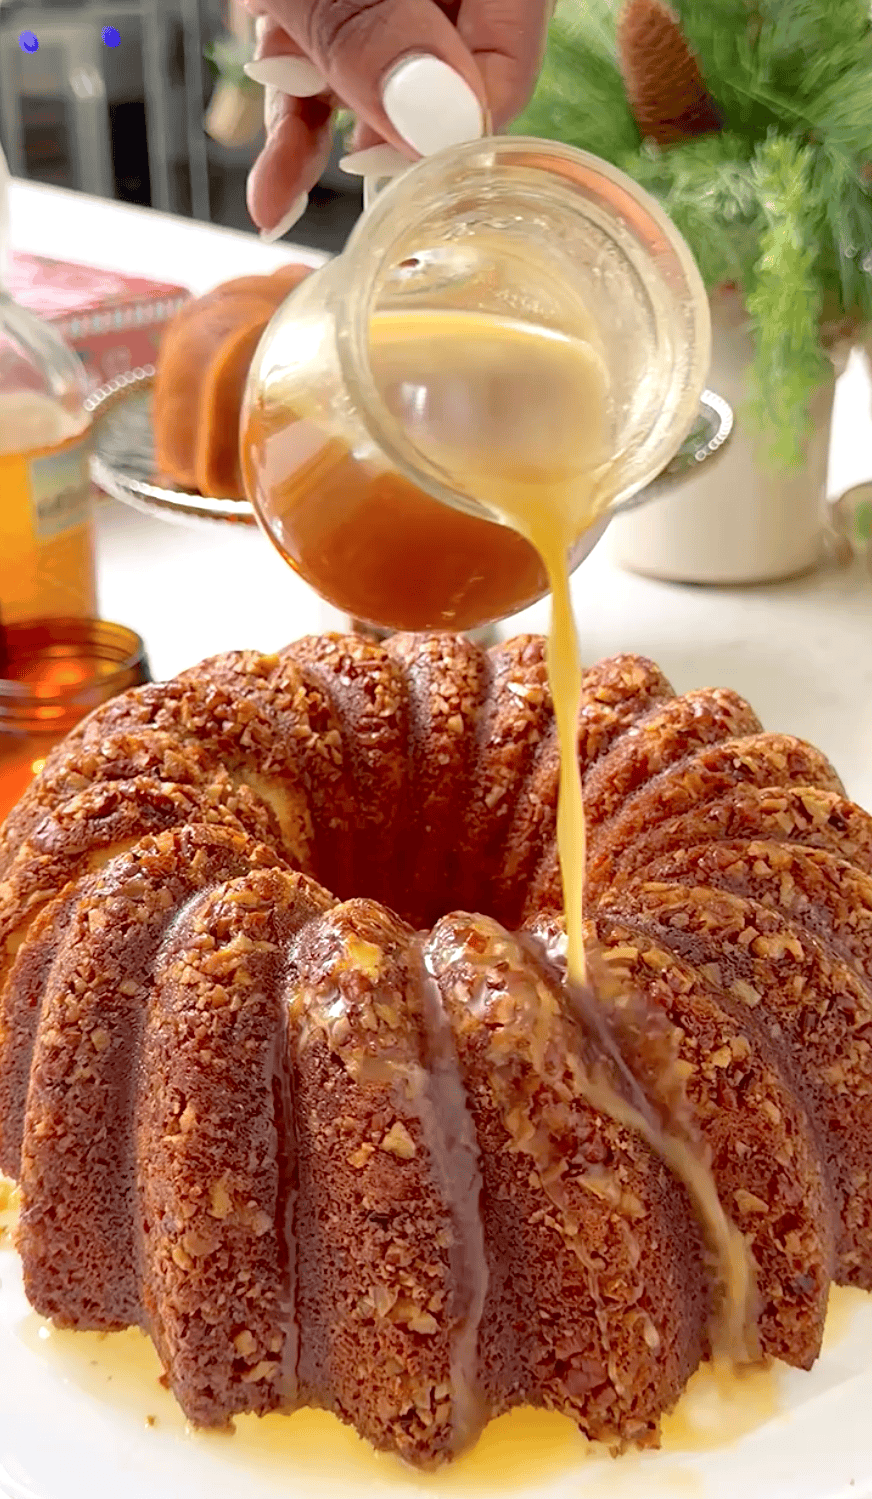
- Line the bottom of the greased bundt pan with chopped pecans. Pour the batter over the pecans. (Photos 5-7)
- Bake at 325℉ (160°C) for 55-60 minutes or until a tester comes out clean. Remove from the oven. Let it cool for about 10 minutes before flipping it out onto a cake plate. (Photo 8)
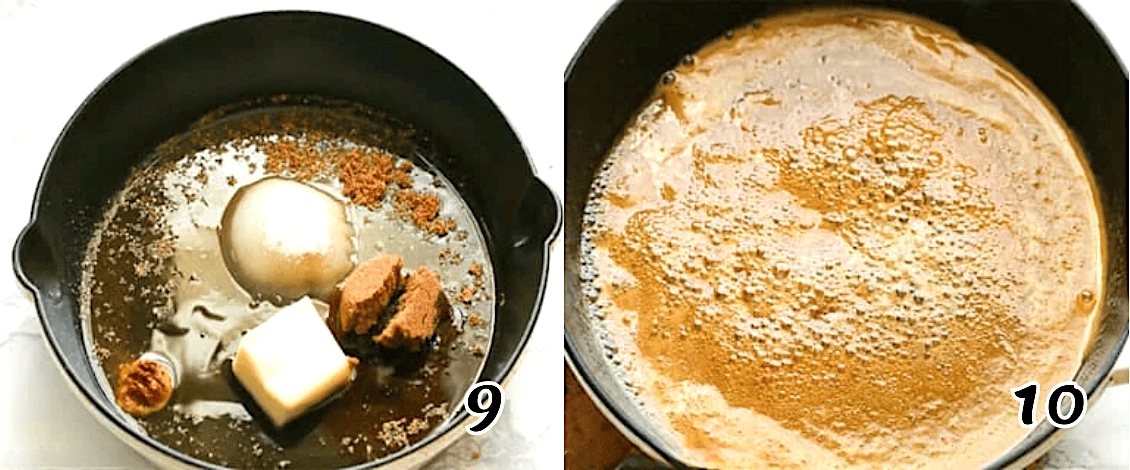
- Rum sauce. In a small saucepan, bring the butter, sugar, rum, and water over medium heat to a boil and simmer for 3-4 minutes. Stir constantly to keep it from burning, then remove from the heat and cool slightly. (Photos 9-10)
- Poke little holes into the cake with a toothpick or skewer. Spoon the syrup over the cake and let it soak in. Let the cake cool to room temperature before slicing and serving.
Tips and Notes
- Dark rum adds a deeper color and flavor. But you can use the light if that’s what you have; even spiced rum provides delicious results.
- If you prefer skipping the rum glaze, a simple syrup, vanilla glaze, chocolate glaze, or both works fine. You can also completely leave the glaze off.
- Let the cake cool for 5-10 minutes before removing it from the pan so it firms up and holds together better.
- If you want a more spiked rummy flavor, go ahead and add more rum to the glaze after taking it off the heat! I won’t tell.
- If your cake ends up drier than you want, soak it with more rum glaze.
Make Ahead and Storage
Rum cake tastes even better after it has had time to soak in the rum sauce. It should last fine for 3-4 days at room temperature, a week in the fridge, or 5-6 months in the freezer.
If you freeze individual slices, you have an emergency sweet tooth fix or a treat for surprise guests. Thaw it quickly in the microwave and enjoy.
More Decadent Holiday Cakes to Enjoy
By Imma
Watch How to Make It
[adthrive-in-post-video-player video-id=”yhMs8hHB” upload-date=”2019-05-07T07:00:44.000Z” name=”Rum Cake” description=”Rum Cake – traditional rum cake from scratch – no mixes. Light & fluffy topped with chopped pecans and soaked in a reduced sugared rum glaze. So good you would want to eat the whole thing.”]
This blog post was originally published in October 2018 and has been updated with additional tips and gorgeous new photos.

Leave a Reply